Showing posts with label Articles - Advance Java. Show all posts

Saturday, January 14, 2012

Authentication in Web.xml

Authentication

A web container can authenticate a web client/user using either HTTP BASIC, HTTP DIGEST, HTTPS CLIENT or FORM based authentication schemes.

Use Case: We would like to utilize the browser authentication mechanism, HTTP BASIC as defined in the HTTP 1.0 specification.

The login-config.xml element in web.xml would look like the following:
<login-config>
    <auth-method>BASIC</auth-method>
    <realm-name>default</realm-name>
</login-config>

Use Case: We would like to utilize HTTPS Client authentication mechanism that is based on digital certificates. The authentication is based on the user's X509 certificate. The login-config.xml element in web.xml would look like the following:

<login-config>
   <auth-method>CLIENT-CERT</auth-method>
   <realm-name>JMX Console</realm-name>
</login-config>

Use Case: We would like to utilize FORM based authentication mechanism. FORM based mechanism provides flexibility in defining a custom jsp/html page for login and another page to direct for errors during login. The login-config xml element in web.xml would look like the following:

<login-config>
   <auth-method>FORM</auth-method>
   <form-login-config>
       <form-login-page>/login.html</form-login-page>
      <form-error-page>/error.html</form-error-page>
   </form-login-config>
</login-config>

In this case, the html page for login is the login.html and if any errors are encountered (including failed login), the user is directed to error.html

Friday, January 13, 2012

Implement Security in Web.xml

Use Case:3 We would like to exclude a set of web resources from any access. This can arise when a certain portion of the web application needs to undergo some form of maintenance or is not applicable for a particular physical deployment of a generic web application. We will achieve this with authorization constraints that specify no roles.


<security-constraint>
   <display-name>excluded</display-name>
   <web-resource-collection>
      <web-resource-name>No Access</web-resource-name>
      <url-pattern>/excluded/*</url-pattern>
      <url-pattern>/restricted/employee/excluded/*</url-pattern>
      <url-pattern>/restricted/partners/excluded/*</url-pattern>
   </web-resource-collection>
   <web-resource-collection>
      <web-resource-name>No Access</web-resource-name>
      <url-pattern>/restricted/*</url-pattern>
      <http-method>DELETE</http-method>
      <http-method>PUT</http-method>
      <http-method>HEAD</http-method>
      <http-method>OPTIONS</http-method>
      <http-method>TRACE</http-method>
      <http-method>GET</http-method>
      <http-method>POST</http-method>
   </web-resource-collection>
   <auth-constraint />
   <user-data-constraint>
      <transport-guarantee>NONE</transport-guarantee>
   </user-data-constraint>
</security-constraint>

Thursday, January 12, 2012

Implement Security in Web.xml

Use Case2: HTTP GET operation on a set of web resources should be accessible only by an user with the role "Employee". We will achieve this with the specification of authorization constraints (auth-constraint element with the role-name element).
<security-constraint>
   <display-name>Restricted GET To Employees</display-name>
   <web-resource-collection>
      <web-resource-name>Restricted Access - Get Only</web-resource-name>
      <url-pattern>/restricted/employee/*</url-pattern>
      <http-method>GET</http-method>
   </web-resource-collection>
   <auth-constraint>
      <role-name>Employee</role-name>
   </auth-constraint>
   <user-data-constraint>
      <transport-guarantee>NONE</transport-guarantee>
   </user-data-constraint>
</security-constraint>

Wednesday, January 11, 2012

Implement Security in Web.xml

In this section, we will look at specifying the security constraints for multiple use cases.

Use Case1: We would like to define a set of web resources that will have unchecked access. We will achieve this by omitting the authorization constrainsts (auth-constraint element).
<security-constraint>
   <web-resource-collection>
     <web-resource-name>All Access</web-resource-name>
     <url-pattern>/unchecked/*</url-pattern>
     <http-method>DELETE</http-method>
     <http-method>PUT</http-method>
     <http-method>HEAD</http-method>
     <http-method>OPTIONS</http-method>
     <http-method>TRACE</http-method>
     <http-method>GET</http-method>
     <http-method>POST</http-method>
   </web-resource-collection>
   <user-data-constraint>
     <transport-guarantee>NONE</transport-guarantee>
   </user-data-constraint>
</security-constraint>

Tuesday, January 10, 2012

Implement Security in web.xml

The deployment descriptor, web.xml is the most important Java EE configuration piece of Java EE Web applications. The security configuration in this descriptor drives the semantics and operation of web container security. Hence it is very critical that web developers and administrators understand the various combinations possible in the security configuration in this descriptor.

Security Constraints

Security Constraints are least understood by web developers, even though they are critical for the security of Java EE Web applications. Specifying a combination of URL patterns, HTTP methods, roles and transport constraints can be daunting to a programmer or administrator. It is important to realize that any combination that was intended to be secure but was not specified via security constraints, will mean that the web container will allow those requests. Security Constraints consist of Web Resource Collections (URL patterns, HTTP methods), Authorization Constraint (role names) and User Data Constraints (whether the web request needs to be received over a protected transport such as TLS). We will told you using 3 use cases.

Thursday, December 22, 2011

Hello World Applet

package org.best.example;

    /*
            Hello World Applet Example
            This java example shows how to create and run Hello World Java Applet.
    */


    import java.applet.Applet;
    import java.awt.Graphics;
    
    /*
     *
     * Applet can either run by browser or appletviewer application.
     * Define <applet> tag within comments as given below to speed up
     * the testing.
     */
    
    /*
    <applet code="HelloWorldApplet" width=100 height=100>
    </applet>
    */
    
    //every applet must extend from java.applet.Applet class
    public class HelloWorldApplet extends Applet{
    
            /*
             * Override paint method.
             * paint method is called every time the applet needs to redisplay
             * it's output. For example, when applet is first displayed or applet
             * window is minimized and then restored.
             *
             */
            public void paint(Graphics g){
                  
                    /*
                     * Use
                     * void drawString(String str, int x, int y)
                     * method to print the string at specified location x and y.
                     */
                    g.drawString("Hello World", 50, 50);
            }
    }

Thursday, October 13, 2011

Java coming to a TV near you!

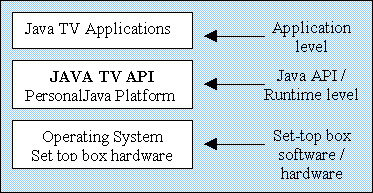
Imagine Java applications running on your television set. Sound far fetched? The new Java TV API promises to allow applications access to all the functionality of digital television sets, which will run the PersonalJava JVM.
TV for Java
Okay. When I first read about the Java TV API last year, I thought the idea of Java running on set-top boxes was quite amusing. After all, we've all had the experience of slow loading applets running inside web-browsers, that amount to little more than eye-candy for the easily amused. Certainly, there are some serious Java applets out there, but they're few and far between, and with cross-browser compatibility issues, limited in their audience reach.
Then the enormity of it hit me - while the number of computers in households is still small, and the number of Internet users even more so, the number of people with television sets is MASSIVE. This one concept has the potential to introduce the word "Java" to hundreds of millions of people world-wide. Digital TV may be slow to get a foothold, but it's almost a certainty.  Now imagine all those people running Java applications (or applets) right from their television. High bandwidth HDTV or cable connections could be integrated with interactive Java content, ranging from simple games, stock tickers, and online shopping. The scope of the Java TV API is very big indeed.
The Java TV API is designed to allow Java applications access to the functionality of the television host on which it runs. Through the Java TV API, which will provide access to television programming content (de-multiplexed on-the-fly), content selection (program guides), and control over the television screen appearance. Applications can run on a Java Virtual Machine (JVM) designed for set-top boxes, televisions, and real-time devices. The underlying hardware details are abstracted away, leaving developers free to concentrate on developing interactive content, not porting it from one system to another.
Java TV Overview
Here's where Java technology comes into its own. Not only is it portable, not only is there an existing code base to work with and familiarity amongst developers, but it will be easy to move applications from one system to another. That means consumers (and cable companies) won't be left with antiquated systems that can only run a small range of software.
Integrated with the Java TV API will be other related technologies. For example, Java already has support for decoding and processing multimedia content, through the Java Media Framework. New decoders for television content can be added, as well as existing mechanisms such as MPEG. Imagine a high speed cable network that allows audio playback of MP3 music! As new content streaming formats are developed, applets can gain access to decoders as they are added to the JMF. This means that set-top software doesn't need to be manually updated - new formats can be downloaded on-the-fly.
The Java TV API has the potential to revolutionize the Java landscape. Sure Java made inroads into browsers, and is having increasing success in the server-side market, but imagine the potential of set-top boxes all around the world running Java. That's a big market for Sun, for cable and television companies, and for software developers.
For more information on the Java TV API, you can follow its progress at Sun, http://java.sun.com/products/javatv/

Tuesday, October 11, 2011

How to configure Tomcat to support SSL or https


A guide to show you how to configureTomcat 6.0 to support SSL or https connection.

1. Generate Keystore

First, uses “keytool” command to create a self-signed certificate. During the keystore creation process, you need to assign a password and fill in the certificate’s detail.
$Tomcat\bin>keytool -genkey -alias bestjavapractices -keyalg RSA -keystore c:\ bestjavapracticeskeystore
Enter keystore password:
Re-enter new password:
What is your first and last name?
  [Unknown]:  Amit Kumar Mangal
What is the name of your organizational unit?
  //omitted to save space
  [no]yes
 
Enter key password for <bestjavapractices>
        (RETURN if same as keystore password):
Re-enter new password:
 
$Tomcat\bin>
Here, you just created a certificate named “bestjavapracticeskeystore“, which locate at “c:\“.
Certificate Details
You can use same “keytool” command to list the existing certificate’s detail
$Tomcat\bin>keytool -list -keystore c:\ bestjavapracticeskeystore
Enter keystore password:
 
Keystore type: JKS
Keystore provider: SUN
 
Your keystore contains 1 entry
 
mkyong, 14 Disember 2010, PrivateKeyEntry,
Certificate fingerprint (MD5): C8:DD:A1:AF:9F:55:A0:7F:6E:98:10:DE:8C:63:1B:A5
 
$Tomcat\bin>

2. Connector in server.xml

Next, locate your Tomcat’s server configuration file at $Tomcat\conf\server.xml, modify it by adding a connector element to support for SSL or https connection.
File : $Tomcat\conf\server.xml
 //...
<!-- Define a SSL HTTP/1.1 Connector on port 8443
         This connector uses the JSSE configuration, when using APR, the 
         connector should be using the OpenSSL style configuration
         described in the APR documentation -->
 
<Connector port="8443" protocol="HTTP/1.1" SSLEnabled="true"
               maxThreads="150" scheme="https" secure="true"
               clientAuth="false" sslProtocol="TLS" 
               keystoreFile="c:\bestjavapracticeskeystore "
               keystorePass="password" />
  //...
Note
keystorePass="password" is the password you assigned to your keystore via “keytool” command.

3. Done


Saved it and restart Tomcat, access to https://localhost:8443/
In this example, we are using Google Chrome to access the Tomcat configured SSL site, and you may notice a crossed icon appear before the https protocol :), this is caused by the self-signed certificate and Google chrome just do not trust it.
In production environment, you should consider buy a signed certificate from trusted SSL service provider like verisign or sign it with your own CA server

Reference

  1. Tomcat 6 : SSL configuration HOW-TO


Monday, October 10, 2011

Resolve java.lang.OutOfMemoryError: PermGen space -2


Tomcat production server sometime will hit the following java.lang.OutOfMemoryError: PermGen space error.
java.lang.OutOfMemoryError: PermGen space
        at java.lang.ClassLoader.defineClass1(Native Method)
        at java.lang.ClassLoader.defineClass(ClassLoader.java:620)
        at java.security.SecureClassLoader.defineClass(SecureClassLoader.java:124)
It’s usually happened when the Tomcat start and stop few times. It’s just funny, however you can fine tune it with some minor changes in the Tomcat configuration setting. By default, Tomcat assigned very little memory for the running process, you should increase the memory by make change in catalina.sh or catalina.bat file.

How to fix it?

1) Find where is Cataline.sh located. We need to make some changes in “catalina.sh” file.
P.S Cataline.sh is located at \tomcat folder\bin\catalina.sh
2) Assign following line to JAVA_OPTS variable and add it into catalina.sh file.
JAVA_OPTS="-Djava.awt.headless=true -Dfile.encoding=UTF-8 
-server -Xms1536m -Xmx1536m
-XX:NewSize=256m -XX:MaxNewSize=256m -XX:PermSize=256m 
-XX:MaxPermSize=256m -XX:+DisableExplicitGC"
Partial example of the catalina.sh file
#   JSSE_HOME       (Optional) May point at your Java Secure Sockets Extension
#                   (JSSE) installation, whose JAR files will be added to the
#                   system class path used to start Tomcat.
#
#   CATALINA_PID    (Optional) Path of the file which should contains the pid
#                   of catalina startup java process, when start (fork) is used
#
# $Id: catalina.sh 609438 2008-01-06 22:14:28Z markt $
# -----------------------------------------------------------------------------
 
JAVA_OPTS="-Djava.awt.headless=true -Dfile.encoding=UTF-8 -server -Xms1536m 
-Xmx1536m -XX:NewSize=256m -XX:MaxNewSize=256m -XX:PermSize=256m 
-XX:MaxPermSize=256m -XX:+DisableExplicitGC"
 
 
# OS specific support.  $var _must_ be set to either true or false.
cygwin=false
os400=false
darwin=false
case "`uname`" in
CYGWIN*) cygwin=true;;
OS400*) os400=true;;
Darwin*) darwin=true;;
esac
 
# resolve links - $0 may be a softlink
PRG="$0"
3) Done. Restart Tomcat.
You should change the “Xms” and “PermSize” value base on your server capability.

Saturday, October 8, 2011

How to configure MySQL DataSource in Tomcat 6


1. Get MySQL JDBC Driver
Get JDBC driver here – http://www.mysql.com/products/connector/ , for example, mysql-connector-java-5.1.9.jar, and copy it to $TOMCAT\lib folder.
2. Create META-INF/context.xml
Add a file META-INF/context.xml into the root of your web application folder, which defines database connection detail :
File : META-INF/context.xml
<Context>

  <Resource name="jdbc/bestjavapractices " auth="Container" type="javax.sql.DataSource"
               maxActive="50" maxIdle="30" maxWait="10000"
               username="mysqluser" password="mysqlpassword"
               driverClassName="com.mysql.jdbc.Driver"
               url="jdbc:mysql://localhost:3306/bestjavapractices"/>

</Context>
3. web.xml configuration
In web.xml, defines your MySQL datasource again :
  <resource-ref>
        <description>MySQL Datasource example</description>
        <res-ref-name>jdbc/bestjavapractices </res-ref-name>
        <res-type>javax.sql.DataSource</res-type>
        <res-auth>Container</res-auth>
  </resource-ref>
See a full web.xml example below :
File : web.xml
<?xml version="1.0" encoding="UTF-8"?>
<web-app xmlns:xsi="http://www.w3.org/2001/XMLSchema-instance"
        xmlns="http://java.sun.com/xml/ns/javaee"
        xmlns:web="http://java.sun.com/xml/ns/javaee/web-app_2_5.xsd"
        xsi:schemaLocation="http://java.sun.com/xml/ns/javaee
        http://java.sun.com/xml/ns/javaee/web-app_2_5.xsd"
        id="WebApp_ID" version="2.5">

  <display-name>MySQL DataSource Example</display-name>

  <resource-ref>
        <description>MySQL Datasource example</description>
        <res-ref-name>jdbc/bestjavapractices </res-ref-name>
        <res-type>javax.sql.DataSource</res-type>
        <res-auth>Container</res-auth>
  </resource-ref>

</web-app>
4. Run It
Resource injection (@Resource) is the easiest way to get the datasource from Tomcat, see below :
import javax.annotation.Resource;
public class CustomerBean{

        @Resource(name="jdbc/bestjavapractices ")
        private DataSource ds;

        public List<Customer> getCustomerList() throws SQLException{

          //get database connection
          Connection con = ds.getConnection();
          //...
Alternatively, you can also get the datasource via context lookup service :
import javax.naming.Context;
import javax.naming.InitialContext;
public class CustomerBean{

        private DataSource ds;

        public CustomerBean(){
          try {
               Context ctx = new InitialContext();
               ds = (DataSource)ctx.lookup("java:comp/env/jdbc/bestjavapractices ");
          } catch (NamingException e) {
               e.printStackTrace();
          }
        }

        public List<Customer> getCustomerList() throws SQLException{

          //get database connection
          Connection con = ds.getConnection();
          //...
Reference
  1. Tomcat 6 : JNDI Datasource HOW-TO